Inserting an Image into a Blog that Doesn't Do Image Hosting
These posters
are ready to print out and use with your
students to help them enhance their blogs.
The Text from the Poster
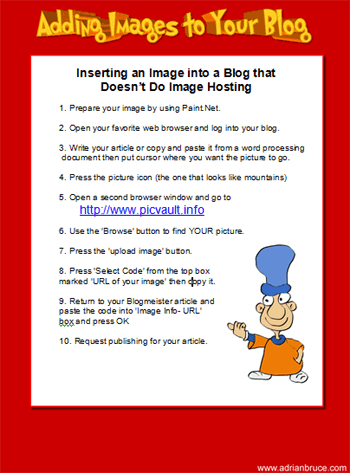
1. Prepare your image by using Paint.Net.2. Open your favorite web browser and log into your blog.
3. Write your article or copy and paste it from a word processing
document then put cursor where you want the picture to go.4. Press the picture icon (the one that looks like mountains)
5. Open a second browser window and go to
http://www.picvault.info6. Use the 'Browse' button to find YOUR picture.
7. Press the 'upload image' button.
8. Press 'Select Code' from the top box
marked 'URL of your image' then copy it.9. Return to your Blogmeister article and
paste the code into 'Image Info- URL'
box and press OK10. Request publishing for your article.
- Using PicVault - Acrobat Version
Tips & Tricks:
NB - You may have to experiment with a few photo hosts to see which ones work for you.
Adding
Images to Your Blog- - Using http://xs.to - Acrobat Version |
Adding
Images to Your Blog- - Using http://imageshack.us/ - Acrobat Version |
Need
to Know More
About Blogging -
Check Out these Guys

Classroom
Blogging:
2nd Edition

Blogs,
Wikis, Podcasts, and
Other Powerful Web Tools
for Classrooms
Back to Blogging Tools